Again, this part and part 1 have nothing to do with public nudity. This is all about your camera’s light meter as it relates to your cameras ability to get properly exposed images. Please refer back to Part 1 to get an understanding of how your light meter works and its settings. Now let’s take a look at how to troubleshoot when you start to get indecent exposures.
• Damaged or Out of Alignment Light Meter: Obviously if your sensor isn’t positioned correctly or is corrupt in some way you’re probably going to have issues. This usually happens from an impact to the top of the camera.
• Back Lit Situation: This is a very common occurrence where your subject is against a brightly lit background. A common example of that is a person in front of a window; the light coming through the window fools the light meter into telling the camera to expose for the bright light. The result is a subject that is dark and under exposed; use the center weighted meter setting or use a flash to fix this problem.
• Unaware of Spot Meter Mode Selection: This can cause extreme exposure issues. If the spot meter reads from a bright area your image will come out under exposed; if it meters from something dark the image will come out over exposed. That spot only has to move a little and your exposure will change greatly.

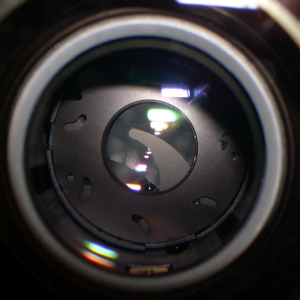
SLR lens with a visibly broken aperture. View from front lens element looking through (detached from camera).
• Lens Aperture or the Aperture Control System Failure: For consistently over or under exposures one possible culprit is the aperture function of your lens or camera. Some lenses allow you to check your lens aperture function. One way to do this is by removing it, looking through the lens and moving the lever near the mount to see if the aperture is opening and closing. Another way is using the “depth of field preview†lever or button, look into the front of the lens and observe the aperture function at various aperture settings (f/2=wide open through f/22=closed down); if it is a zoom lens, check this at various zoom settings to detect an intermittent problem. Tell tale signs are askew blades, oily blades and hanging blades. You can also try another lens on your camera and try the lens on a different camera to see if it produces the same problem.
• Shutter worn out or damaged: If your camera’s shutter wares out or your camera’s shutter is damaged your camera may not always detect an error and this will affect your exposure. You can inspect the shutter for damage by removing your lens and lifting up the mirror. WARNING: If you attempt doing this yourself, you must use extreme caution; you can very easily cause damage where there was none.
• Aftermarket Focus Screens: Some claim to be brighter, clearer or offer a special grid to help improve image composition. These can cause exposure issues and when it does you must adjust your “exposure compensation†setting accordingly for proper exposure.
Any time you believe you are having exposure issues it is always recommended that you send in both the body and the lens that the problem is the most apparent.
article image by Flickr user Todd Huffman
